Windows Vista/2008/7全系列(x86、x64)ISO镜像文件硬盘安装方法
本方法适合移动硬盘、硬盘、U盘、USB读卡器等可启动介质安装 Windows Vista、 Windows 2008、 Windows 7 全系列(X86、AMD64)系统。本方法和DVD光驱安装没有太大的差别,只是启动和中间会用到grub4dos/ImDisk来虚拟光驱; 还有本文中选用ImDisk作虚拟光驱软件, 是因为自己在别的WinPE里接触过,在别的方面也常用,大家可以选择适合自己的来代替都是可以的, ImDisk是我在x86/x64(2008/win7)上都测试过的。下面以 移动硬盘+win7p64.iso 为例
软件需求:
Windows ISO镜像, 此例中为win7p64.iso。 Windows Vista、 Windows 2008、 Windows7 全系列(x86、x64)都可以; 推荐放置在硬盘/移动硬盘上(速度快),此例中放在移动硬盘中:- grubinst 用于
移动硬盘(或其其它安装盘)引导扇区的写入。 - grub4dos 需要做成可启动的,可放在
移动硬盘、硬盘、U盘、USB读卡器、光盘、pxe服务器上。
如果ISO文件在USB设备上,grub4dos也应该装在同一个设备(大家可以试一试别的,能找到ISO文件就行) - ImDisk 直接下载原版;默认带有x86、x64驱动,所以可以直接用于x86、x64版本安装。
- Contig 使文件以连续的方式存储。
安装示例:
为了方便抓图,这里在VMware里用第二块硬盘模拟移动硬盘操作,假设该移动硬盘只有一个分区,并且识别成盘符X:
制作移动硬盘:
- 解压缩下载到的grubinst, 执行里面的
grubinst_gui.exe(以管理员模式运行),选择要写入的磁盘(这里是移动硬盘),点击安装。 -
如果有错误
grubinst: Bad partition table, if you're sure that the partition list is ok, please run this program again with --skip-mbr-test option.此时可以通过以下方法解决:``` Go to disk management. Backup data if you have such on the USB disk. Delete all partitions. Create new ones. Set first one active. Using safely remove hardware icon disconnect the disk. Replug it and try the program again. ``` -
如果无法删除所有分区,那么需要通过以下操作实现删除所有分区:
``` There's no need to install any third-party programs, Windows already includes everything you need. Just open up command prompt and enter the following commands in sequence: DISKPART LIST DISK Select the disk that you want to correct. Example: I want to remove all partitions on Disk 1: SELECT DISK 1 RECOVER If the RECOVER command doesn't work, try CLEAN. Disk 1 will be recovered as one complete disk. FORMAT <option> Where <options> represent what formatting method you'd prefer. Alternatively, use QUICK. ``` - 解压缩下载到的grub4dos, 复制里面的文件到
移动硬盘X:根目录下。删除根目录下的menu.lst(让其自动进入命令模式) - 解压缩下载到的ImDisk; 如果是可执行文件,照样可以解压缩。复制里面的文件到
移动硬盘X:根目录下 - 复制win7p64.iso到
移动硬盘X:根目录 -
解压缩下载到的Contig,复制Contig.exe到
移动硬盘X:根目录, 执行以下命令:pushd X: (`移动硬盘X:`根目录) Contig.exe win7p64.iso Contig.exe的意义是为了让win7p64.iso连续存储; grub4dos需要调用 `map /win7p64.iso`,而文件win7p64.iso比较大,故这里不准备在grub4dos里把它整个map到内存;因此必须保证它在磁盘上是连续存放的。
移动硬盘结构:
X:
│  badgrub.exe
│  bootlace.com
│  ChangeLog_GRUB4DOS.txt
│  config.sys
│  COPYING
│  default
│  Get_Source_of_This_Build.txt
│  gpl.txt
│  grldr
│  grldr.mbr
│  grub.exe
│  grub.pif
│  hmload.com
│  imdisk.inf
│  install.cmd
│  menu.lst
│  msgbox.exe
│  readme.txt
│  README_GRUB4DOS.txt
│  runwait.exe
│  win7p64.iso
│
├─awealloc
│  ├─amd64
│  │      awealloc.sys
│  │
│  ├─i386
│  │      awealloc.sys
│  │
│  └─ia64
│          awealloc.sys
│
├─chinese
│      badgrub.exe
│      grldr
│      grub.exe
│
├─cli
│  ├─amd64
│  │      imdisk.exe
│  │
│  ├─i386
│  │      imdisk.exe
│  │
│  └─ia64
│          imdisk.exe
│
├─cpl
│  ├─amd64
│  │      imdisk.cpl
│  │
│  ├─i386
│  │      imdisk.cpl
│  │
│  └─ia64
│          imdisk.cpl
│
├─svc
│  ├─amd64
│  │      imdsksvc.exe
│  │
│  ├─i386
│  │      imdsksvc.exe
│  │
│  └─ia64
│          imdsksvc.exe
│
└─sys
	├─amd64
	│      imdisk.sys
	│
	├─i386
	│      imdisk.sys
	│
	└─ia64
			imdisk.sys
安装操作系统:
-
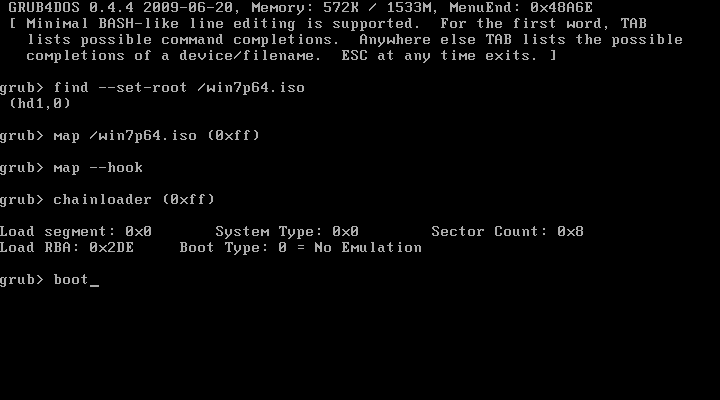
设置BIOS引导盘为
移动硬盘(也可以是U盘或是其它安装盘); 启动电脑;进入到grub4dos界面;如下图所示(图1):

-
在GRUB命令模式下执行以下命令(注:命令要一字不差的全部输入,一行为一条命令,没有注释):
 find --set-root /win7p64.iso
 map /win7p64.iso (0xff)
 map --hook
 chainloader (0xff)
 boot
如果显示的win7p64.iso所在磁盘位置为(hd0,0) 那么重启电脑,执行以下命令:
 map (hd0) (hd1)
 map (hd1) (hd0)
 find --set-root /win7p64.iso
 map /win7p64.iso (0xff)
 map --hook
 chainloader (0xff)
 boot
一般情况下执行情况如下图所示(图2):
- 下面进入正常的Win7安装,直到下图所示界面(图3):
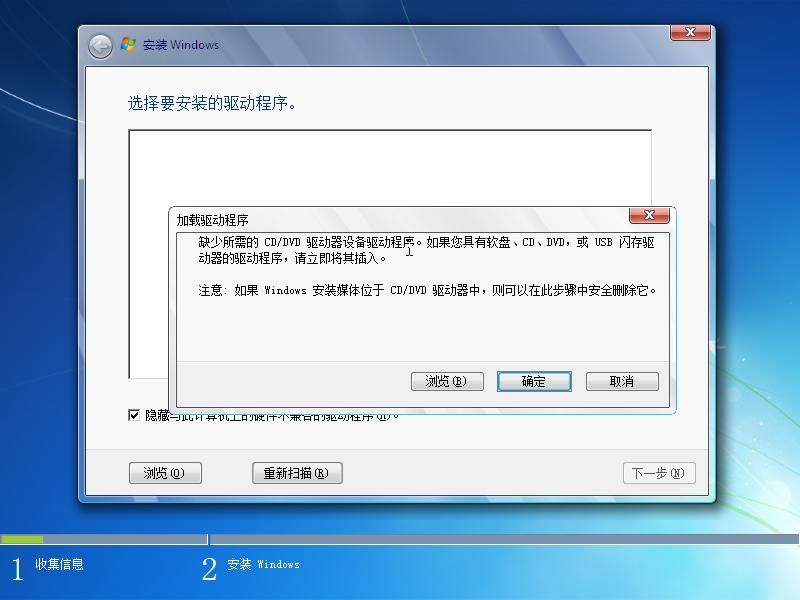
-
上一步就因为找不到真实的光驱,所以报错,此时点击
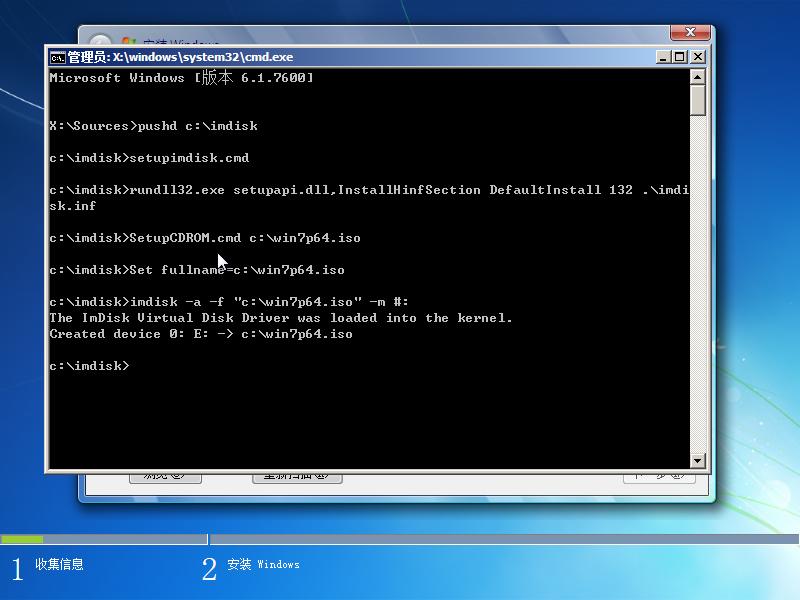
Shift+F10调出CMD窗口, 通过imdisk挂载win7p64.iso为虚拟光驱;执行以下一系列命令:cd /d X:/imdisk (您那里可能是E: F:,即VMware虚拟硬盘所在的盘符,此为注释,或者U盘) install.bat cd .. imdisk -a -f "win7p64.iso" -m #:执行情况如下图所示:
-
执行完上一步,关闭cmd窗口,再关闭另外的可看到的那几个窗口,会返回到(图4)
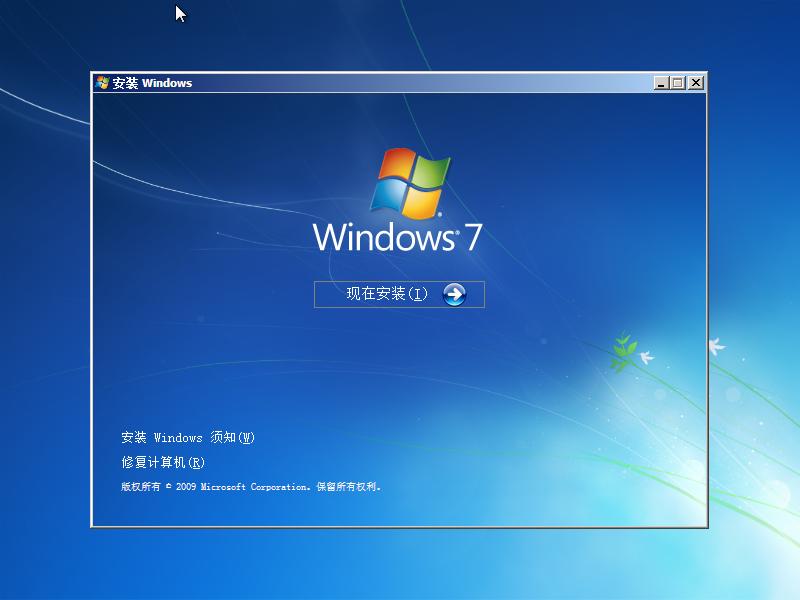
- 点击”现在安装”,以下就和DVD光盘安装一样了,后面在重新启动机器的时候可以拔掉移动硬盘或USB设备(防止再从安装盘启动)